Compress Files with PowerShell, Easily.

PowerShell is a powerful scripting language and command-line shell developed by Microsoft, offering system administrators and power users a robust toolset for automating tasks and managing Windows environments. One of its many capabilities is the ability to compress and decompress files, which can be particularly useful for backup purposes, sharing large datasets, or optimizing storage space.
In this comprehensive guide, we will explore the step-by-step process of using PowerShell to compress files, providing a detailed yet accessible tutorial for both experienced and novice users. By following these instructions, you'll be able to efficiently create compressed archives, a valuable skill for anyone working with large amounts of data.
Prerequisites and Setup

Before we begin, ensure that you have the necessary permissions to execute PowerShell scripts and commands. Depending on your Windows version and security settings, you might need to run PowerShell as an administrator to access certain features.
To check if PowerShell is installed on your system, simply open the PowerShell console by searching for "PowerShell" in the Windows Start menu. If the console opens, you're good to go! If not, you can download and install the latest version of PowerShell from the official Microsoft documentation.
Compressing Files with PowerShell

To compress files with PowerShell, we’ll be using the Compress-Archive cmdlet, which is designed specifically for this purpose. Here’s a step-by-step breakdown of the process:
Step 1: Identify Files to Compress
First, you need to determine which files or folders you want to compress. You can specify individual files or entire directories. For example, let’s say we want to compress all the files in the “C:\ProjectFiles” directory.
Step 2: Create a Compressed Archive
Next, we’ll use the Compress-Archive cmdlet to create a compressed archive. Here’s the basic syntax:
Compress-Archive -Path -DestinationPath
Replace
Compress-Archive -Path 'C:\ProjectFiles\*' -DestinationPath 'C:\CompressedArchives\project_backup.zip'
In this command, the * symbol is a wildcard that represents all files and subdirectories within the "C:\ProjectFiles" directory.
You can also specify additional parameters to fine-tune the compression process. For example, the -CompressionLevel parameter allows you to set the compression level, with options like Fastest, Optimal, or NoCompression. Here's an example:
Compress-Archive -Path 'C:\ProjectFiles\*' -DestinationPath 'C:\CompressedArchives\project_backup.zip' -CompressionLevel Optimal
Step 3: Execute the Compression
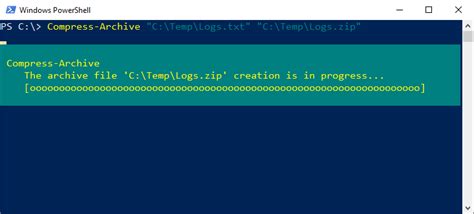
With your command ready, execute it in the PowerShell console. You should see a progress bar indicating the compression process. Once it’s complete, you’ll find your compressed archive at the specified destination path.
Tips and Best Practices
- Batch Compression: If you have multiple directories or files to compress, you can create a PowerShell script to automate the process. Simply loop through each item and execute the
Compress-Archivecmdlet. - Password Protection: To add an extra layer of security, you can use the
-Updateparameter to add a password to your compressed archive. This ensures that only those with the password can access the contents. - Exclusion Filters: You can exclude certain files or directories from compression by using the
-Excludeparameter. This is useful if you want to exclude specific file types or large files that might slow down the compression process.
Decompressing Files with PowerShell
Decompressing files with PowerShell is just as straightforward as compression. You’ll use the Expand-Archive cmdlet, which is the counterpart to Compress-Archive.
Step 1: Identify the Compressed Archive
Locate the compressed archive you want to decompress. Make sure you know its path and name.
Step 2: Execute Decompression
Use the Expand-Archive cmdlet with the following syntax:
Expand-Archive -Path -DestinationPath
Replace -DestinationPath parameter, the files will be extracted to the same directory as the archive.
For example, to decompress the "project_backup.zip" archive in the "C:\ProjectFiles" directory, you'd use the following command:
Expand-Archive -Path 'C:\CompressedArchives\project_backup.zip' -DestinationPath 'C:\ProjectFiles'
Tips for Decompression
- Overwrite Existing Files: By default,
Expand-Archivewill not overwrite existing files in the destination directory. To force overwrite, use the-Forceparameter. - Preserve Original Path Structure: If your archive maintains the original path structure, you can use the
-PreserveFullPathparameter to ensure the files are extracted to their original directories.
Additional PowerShell Compression Features
PowerShell offers several additional features for advanced compression tasks.
Create Self-Extracting Archives
With the Compress-Archive cmdlet, you can create self-extracting archives that can be decompressed without requiring PowerShell or any other tools. This is especially useful for distributing files to users who might not have access to PowerShell.
Archive Splitting
If you have large files that exceed the maximum size limit for a single archive, you can use the -Split parameter to split the archive into multiple parts. This is particularly handy for sharing large datasets via email or other size-restricted platforms.
Compression Formats
PowerShell supports various compression formats, including ZIP, GZIP, and TAR. You can specify the desired format using the -CompressionType parameter.
Conclusion

PowerShell’s compression capabilities offer a powerful and flexible solution for managing and sharing files. By following this guide, you should now be equipped to efficiently compress and decompress files, as well as explore more advanced features as needed.
How do I specify a password for my compressed archive?
+To add a password to your compressed archive, use the -Update parameter along with the -Password parameter. For example: Compress-Archive -Path ‘C:\ProjectFiles*’ -DestinationPath ‘C:\CompressedArchives\project_backup.zip’ -Update -Password ‘YourPassword’. Replace ‘YourPassword’ with your desired password.
Can I compress multiple directories into a single archive?
+Yes, you can compress multiple directories into a single archive. Simply specify each directory path separated by a comma in the -Path parameter. For instance: Compress-Archive -Path ‘C:\Dir1*’, ‘C:\Dir2*’ -DestinationPath ‘C:\CompressedArchives\combined_backup.zip’.
How do I exclude certain files or directories from compression?
+To exclude specific files or directories from compression, use the -Exclude parameter. For example: Compress-Archive -Path ‘C:\ProjectFiles*’ -DestinationPath ‘C:\CompressedArchives\project_backup.zip’ -Exclude ‘C:\ProjectFiles\excluded_file.txt’. You can specify multiple exclusions by separating them with commas.


